Node-RED: How to Build Custom Nodes With Dynamic UI
Recently, I had an opportunity to learn new technology for software development with Node.js - Node RED. Briefly speaking, this technology allows to build your program from blocks called pallets.
Node-RED is a programming tool for wiring together hardware devices, APIs and online services in new and interesting ways. It provides a browser-based editor that makes it easy to wire together flows using the wide range of nodes in the palette that can be deployed to its runtime in a single-click.
Simply speaking, you can build your program like a child builds models from Lego bricks. A great advantage of this approach is that even a novice in programming can develop a program with Node-RED.
How Node-RED program can help your business?
It’s useful in case you need to give your clients an opportunity to сontrol certain parts of your application.
Here is an easy example. Imagine that you have a software for report management. You want to allow companies that use your software to set the order in which the reports are processed.
Let’s say that one company wants to send letters, another - receive push notifications, one more - save or delete the reports, etc. In this case, you can provide each company with the custom interface for step by step actions. Programming in Node-RED is a step by step nodes creation. This library of nodes is constantly being enlarged by other developers.
However, these nodes are not suitable for all the tasks. Especially, if it's some specific task for your business. In this case, programmers have to write their own pallets. In general, node red programming comes down to the pallet development.
This is what I want to dwell on in this article. Here is what you will learn:
- How to develop N amount of nodes in one project
- How to set your project with Node-RED
- How to organize your server and UI part
- How to use React with Node-RED
Business challenge
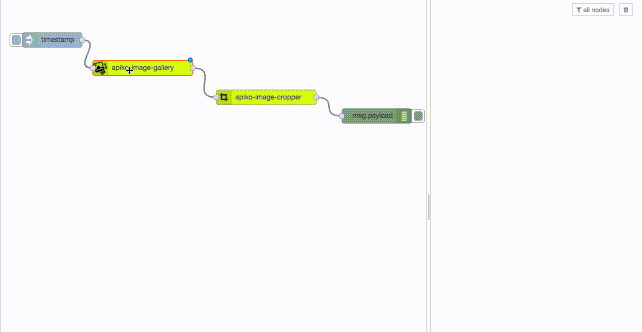
Before writing this article, I have imagined a following situation. The users of a certain application have to send out a product catalog for the next week. That’s why we have to develop a functionality, that will allow to go through the list of products, choose one item, and tell the service to send exactly this item.
First, concentrate on the catalog images. Let’s simplify our task to 3 main steps:
- Сhoosing the image from the catalog
- Editing the image before sending
- Sending images
This task is simple, but perfect by way of example.
Solution
In just several hours of programming, you can create an UI for this task.
With Node-RED, you can significantly cut off the development time. This is because Node-RED already provides the most of the functionality. Here is the example of the app I have developed in half a day.
Finally comes a moment for a step-by-step guide on how to set and develop this project using Node-RED + React.js.
As new nodes in Node-RED are connected as npm packages, there are two options: register each pallet as the separate package or register a set of pallets as one package. It depends on whether you develop a complex from the several nodes or one separate. I’ve taken the second case as a basis, as I think it’s more common. Here is the project structure I’ve developed:
|_ pallets
    |_ <categoryName>-<palletName>
        |_ icons
        |_ ui
           |_ index.js
           |_ build/main.js
        |_ <categoryName>-<palletName>.html
        |_ <categoryName>-<palletName>.js
|_ src
          |_ client/containers
   |_ server
     |_ pallete-managers
        |_ <palletName>
   |_ utils
|_ test
   |_ unit
```
Here are the comments to the directories and project files:
The entire code is avalilable here
Now we can finally proceed to the project development. Let’s review each step in very detail.
Creation of the first Node-RED pallet
First of all, you need to initialize your repository npm unit. Then, decide on the name for the pallets. As your pallets may be used together with others, don’t call them just Сropper. I recommend to create a namespace that will unite all your pallets. In my case, it’s Apiko. Now our pallet will be called apiko-image-cropper.
According to the tutorial, each pallet should contain:
package.jsonlower-case.jslower-case.html
As we already have package.json - now we have to create:
pallets/apiko-image-cropper/apiko-image-cropper.js<- server side codepallets/apiko-image-cropper/apiko-image-cropper.html<- Ui or client side code
After this, let's register the pallet for node-red in package.json
// package.json
{
    "name" : "node-red-contrib-react-example",
    ...
    "node-red" : {
        "nodes": {
            "apiko-image-cropper":"/pallets/apiko-image-cropper/apiko-image-cropper.js",
       }
    }
}
```
apiko-image-cropper.js - this file will be used by node red for registering your pallet and processing the server behavior. Here we will deal only with node.on('input', () => ... callback that will be called when we receive data from the previous pallets.
You can read more here.
// /pallets/apiko-image-cropper/apiko-image-cropper.js
const  MODULE_NAME = 'apiko-image-cropper';

module.exports = function(RED) {
  'use strict';
  function nodeGo(config) {
    RED.nodes.createNode(this, config);
    const node = this;
    node.on('input', (msg) => {
        msg.payload = { newData: {  } }; // extend payload for next pallet
        this.send(msg)
    });
  }

  RED.nodes.registerType(MODULE_NAME, nodeGo);
};
apiko-image-cropper.htms - this file will be used by node red for the registration of UI part of the future pallet.
The things are more complicated here as you need to register several settings for the pallet. You can see the whole list here. I have outlined the most important below:
- 1 - category of the pallet (you can use already created categories or your own ones). In this way, we group the pallets according to their belonging
- 2 - pallet color
- 3 - pallet icon
- 4 - pallet label (the user can change it later, but the default name is here)
- 5 - the list of fields your server part will receive in
msg.payloads. If in the point 7 we’ll have<input type="text" id="node-input-name"node red will render the field value on the server. This is a very important point. You can learn more here https://nodered.org/docs/creating-nodes/properties - 6 - set the number of points connected to other pallets on the input and output
- 7 - content that will be displayed in UI
Point 7 contains a simple <div > . We will use it later for react and for now you can just add <p>hellow world</p>
Node registration in Node-RED
Now when we have created our first node, we can add it to node red and run it from there. First of all, you have to install Node-RED. Then you have to connect your package locally.
cd $HOME/.node-red
npm install <npm-package-name>
Node red stores all its files in the .node-red directory. Now you can view .node-red/pacakge.json and monitor all the packages (pallets) you connect. All you have to do now is to run node-red and check out if everything works perfectly well.
Node-RED server side
There is one thing I don’t like in node-red. All the processing of information from the previous pallets is made in one .js file, to be precise - in node.on('input', method.
If you have just few lines of code, it’s okay. But if you have to write a complicated logic , saving everything in a single file is not a right choice. Fortunately, all this is set in node js and you can render this logic in some processor.
So, in the directory src/server/pallet-managers you can save the logic of processing the server code of your pallets. First of all let’s create the class ImageCropperPalletManager for our pallet apiko-image-cropper that will implement one compulsory method onInput. All the rest is your additional logic.
// /src/server/pallet-managers/image-cropper/ImageCropperPalletManager.js
class ImageCropperPalletManager {
  constructor(RED, palletConfig, node) {
    this._self.palletType = 'apiko-image-cropper';
     this._self.palletType = palletConfig.someProps...// pass payload for this
    this.onInput = this.onInput.bind(this._self);
  }
  onInput(msg) {
    try {
      const { palletType, someProps } = this; // get payload data
      this.send(msg);
    } catch (error) {
     // catch error here
    }
  }
}

module.exports = { ImageCropperPalletManager };
Now let's register our class in apiko-image-cropper.js.
// /pallets/apiko-image-cropper/apiko-image-cropper.js
const { ImageCropperPalletManager } = require('../../src/server/pallet-managers/image-cropper');

module.exports = function(RED) {
  'use strict';
  function nodeGo(config) {
    RED.nodes.createNode(this, config);

    const node = this;
    const palletManager = new ImageCropperPalletManager(RED, config, node);
    // register onInput callback here
    node.on('input', palletManager.onInput);
  }
  ...
};
The whole code of this class is here which is different from what we’ve described above, but this is just a peculiarity of implementation.
Now you can work with any Node.js project. We have seperated the logic of node red from the business logic. One more important thing to remember is the pallet status you can control.
If you want to see the error in UI, just call this.status({ fill:"red", shape:"dot", text: "some error"}); . It’s convenient enough if you want to track the whole process and errors that occur during it.
Add React for UI
Another thing that disappointed me is that node red suggests to use html+jq in all the instances. Of course it’s enough if we want to develop a simple form for data input. But this is not about our case right now. We have to show the list of images in a convenient order and add the opportunity to crop the selected image. With React, you can implement it with two packages:
I haven’t explored the solution with jq, as it’s much easier to write UI with React Vue or Angular. That’s why I’ve decided that React is more suitable for this.
Create our сomponent
Let’s try to create our first React components in the directory /src/client/containers . Let’s create our component and container.
// /src/client/containers/ImageCropper/Container.js
import React from 'react';
import { compose, branch, renderComponent, withHandlers, withState } from 'recompose';

import Component from './Component';

const enhancer = compose(
  ...
  withState('crop', 'setCrop', { x: 10, y: 10, width: 80, height: 80 }),
  withHandlers({
    onSelectFile: props => e => {
      ...
    },
  }),
);

export default enhancer(Component);

// /src/client/containers/ImageCropper/Container.js
....
import ReactCrop, { makeAspectCrop } from 'react-image-crop'
import 'react-image-crop/dist/ReactCrop.css'

import './style.css';

const ImageCropper = ({ node, src, crop, onSelectFile, onImageLoaded, onCropComplete, onCropChange }) => (
  <div className="apiko-image-cropper">
    <h3>Image Cropper</h3>
    <div>
      {src && (
        <ReactCrop
          src={src}
          crop={crop}
          onImageLoaded={onImageLoaded}
          onComplete={onCropComplete}
          onChange={onCropChange}
        />
      )}
    </div>
    <div className="form-row">
      <label htmlFor="node-input-name"><i className="fa fa-tag"></i> Name</label>
      <input type="text" id="node-input-name" placeholder="Name" defaultValue={node.name}/>
      <input type="text" id="node-input-cropX" value={crop.x} className="hide" />
      ...
    </div>
    ...
  </div>
);

export default ImageCropper;
I have omitted some details to not drag out this article. All the code mentioned above is a simple React+Recompose. The entire code is available here.
As I’ve mentioned above, the value of inputes <input type="text" id="node-input-cropX" will be rendered on the server. If the user inputs the value 3, node red will know that the variable is 'cropX===3'. In our case, these variables are set by React. The fields are hidden to not confuse a user.
I would also like to mention the variable window.Apiko.constants.lastSelectedUrl.value. Unfortunately, node-red doesn’t have a mechanism for transferring the data from one pallet into another (on the client). This fact somehow disappointed me, as you often have to create UI based on the values from the previous pallet. That’s why you have to do such tricks.
React build
Now we’ve got the React component set and ready. How can we put them in our node-red pallet? We have an element <div id="apiko-image-cropper"> in the file /pallets/apiko-image-cropper/apiko-image-cropper.html. We have to render our component accordingly. Let’s create the new file /pallets/apiko-image-cropper/ui/index.js that just registers our component.
import ImageCropper from '../../../src/client/containers/ImageCropper';
const onImageCropper = (node) =>
  ReactDOM.render(<ImageCropper node={node} />,
    document.getElementById('apiko-image-cropper'));
Now we have to connect this file to node red. You may think that it’s easy to connect it to apiko-image-cropper.js. However, you are not right. This file is executed on server, when we need to do this on client. Hmm...maybe then let’s use apiko-image-cropper.html? No again. This file is just sent to the client without any compilation.
It’s about to get fun now.
Build your React in the executed fileDescribe the API endpoint to call our file from the serverRun the executed file when the pallet is displayed.
Let’s review this step by step.
React build
This is when the time-honored webpack comes to help. All config is available here. Here is what I would pay attention to:
 const { PALLET_NAME } = process.env;
 ...
 output: {
    path: path.resolve(__dirname, `./pallets/${PALLET_NAME}/ui/build`)
  }
Now you can call the command PALLET_NAME=apiko-image-cropper webpack --mode development. You don’t have to copy the file in the repository. However, you can build and copy it manually in the directory.
API endpoint
Now you have to give the executable file from the server. Fortunately, node red has an opportunity to describe its points in the file apiko-image-cropper.js:
// /pallets/apiko-image-cropper/apiko-image-cropper.js
const { ImageCropperPalletManager } = require('../../src/server/pallet-managers/image-cropper');
const  MODULE_NAME = 'apiko-image-cropper';

module.exports = function(RED) {
  ...
  RED.nodes.registerType(MODULE_NAME, nodeGo);

  RED.httpAdmin.get(`/${MODULE_NAME}/js/*`, (req, res) => {
    res.sendFile(req.params[0], {
      root: __dirname + '/ui/build', // <- get code form this dir
      dotfiles: 'deny'
    });
  });
};
After we have registered new API point /apiko-image-cropper/js/, our code will look for the file main.js in pallets/apiko-image-cropper/ui/build/main.js. with the GET /apiko-image-cropper/js/main.js request. Now we have to call our request from the client.
Calling main.js from the server
Node-RED provides us with two callbacks we can use for this purpose.
oneditprepare - called when the edit dialog is being built (every time we open the window) та onpaletteadd - called when the node type is added to the palette. That's why in the file apiko-image-cropper.js:
 oneditprepare: function () {
      var node = this;
      const fileName = '/apiko-image-cropper/js/main.js';
      $.getScript(fileName) // <- get React code form server part of pallet
        .done(function() {
          window.Apiko.onImageCropperLoad(node);
        })
        .fail(function(jqxhr, settings, exception ){
          console.log('Fail of code load from:[' + fileName + ']', exception)
        });
    },
oneditprepare - why is it so? During the development process, it’s convenient to get new code without reloading the page. You can change it into onpaletteadd in production.
Now let’s run our node red and check if the component has rendered.
Add real-time update
The last thing I want to show is how to add real time update in the similar project. The first challenge I have faced is that I have to build not one, but several pallets. But we have developed two pallets imageCropper and imageGallery.
That’s why I had to run two scripts each time:
PALLET_NAME=apiko-image-cropper webpack --mode development
and
PALLET_NAME=apiko-image-gallery webpack --mode development.
However, I have found an easy way out and written a small script build.sh.
# /build.sh
for PALLET_NAME in "$@"
do
 echo "Build fo $PALLET_NAME "
 PALLET_NAME=$PALLET_NAME npm run build ./pallets/$PALLET_NAME/ui
done
It analyzes the iput parameters and builds react. The input parameters are directory names in ./pallets/. Now you can write npm script
The last step is to add the call of this script when any change in the code is made. For this, we’ll use Nodemon. Every time the modal window opens you will get the new code. Let's add the new script in package.jscon.
// package.jscon
  "start": "nodemon --watch pallets --watch src/client --exec 'npm run build-all'"
And, of course, you also need to run node-red.
Conclusion
In this article I have demonstrated how to develop a small project with Node-RED. Now you know how to set and organize both small and more prominent projects. I have also shown how to use React for UI part of node red. You can use this guide for other UI frameworks such as Vue js, Angular, etc.